
Why Build a Fire Pit Yourself
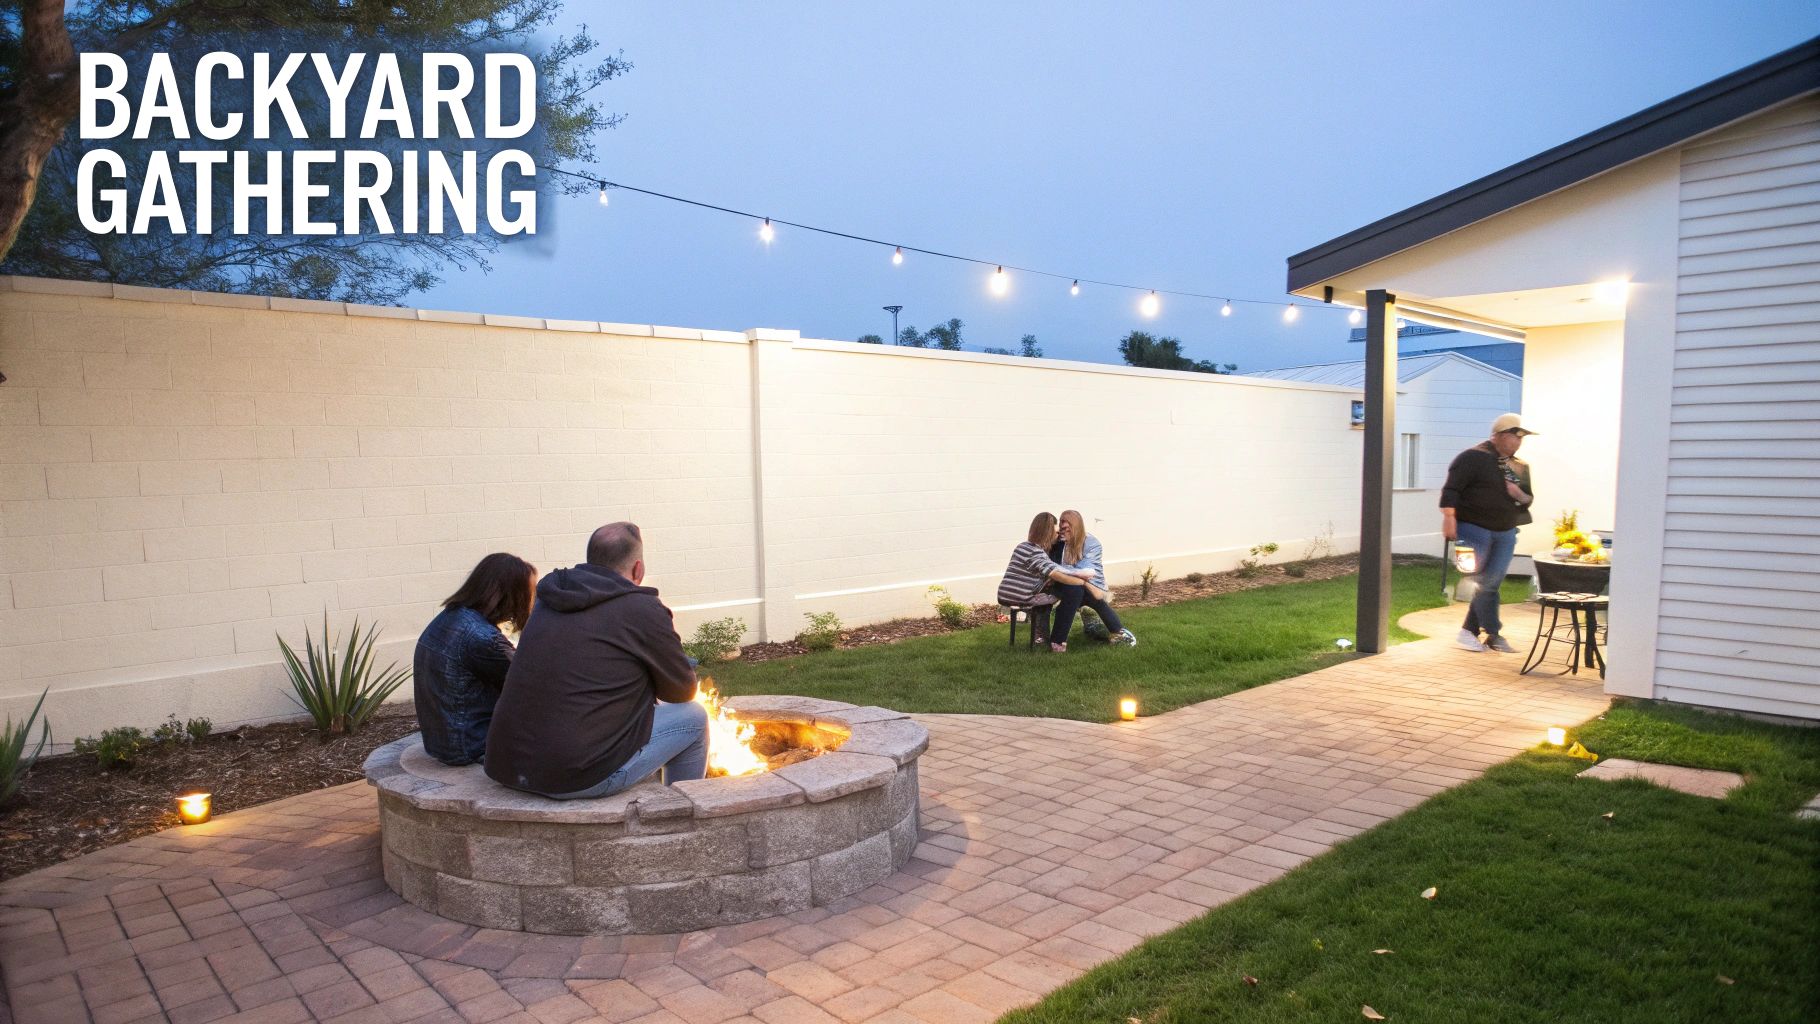
Taking on a DIY fire pit is about so much more than just stacking some stones. It's about creating a true centerpiece for your backyard—a place that naturally draws people together for connection and relaxation. We put this guide together to show you that building a high-quality fire feature is completely within your reach, and the payoff is huge.
It’s no surprise that more homeowners are transforming their backyards into fully-fledged living spaces. The global fire pits market hit USD 7.67 billion recently and is on track to reach USD 14.06 billion by 2034. That growth is all about the demand for better outdoor living, and a fire pit is at the top of the list for most people.
The Value of a DIY Fire Pit
When you decide to build your own fire pit, you get total creative freedom. You're not stuck with a one-size-fits-all kit. Instead, you're crafting something that perfectly fits your home's style and how you actually live.
This hands-on approach means you call all the shots. You pick the exact size and shape, choose materials that match your patio, and decide between the classic crackle of a wood fire or the push-button convenience of gas. It's your vision, brought to life.
Building a fire pit is really about creating experiences. It’s the spot for late-night conversations, roasting marshmallows with the kids, or just kicking back under the stars after a long week.
What to Expect in This Guide
Think of this as your complete roadmap. We've broken down the entire project into clear, manageable stages to build your confidence from the ground up. We’ll cover everything you need to know, from the first sketch to the first fire.
- Planning and Design: We'll dig into the big decisions upfront, like choosing between wood and gas and picking materials that look great and last for years.
- Site Preparation: You'll learn how to lay a proper foundation—the key to a stable, safe structure that won't shift or settle over time.
- Step-by-Step Construction: We'll walk you through building the walls, whether you're using simple paver blocks or going for a custom stone look.
- Finishing and Safety: Find out how to add the final pro touches with capstones and fire media, all while keeping safety codes and best practices in mind.
By the end of this guide, you’ll have the know-how to build a fire pit that doesn’t just look incredible but also adds real value to your home. And for more inspiration on how to make it all work together, check out our guide to some incredible patio design ideas.
Designing Your Fire Pit: Fuel, Materials, and Style
Before you even think about breaking ground, we get to the fun part: designing the fire pit. This is where you decide on its character, and that starts with its heart—the fuel source. Your choice here will dictate not just the look and feel, but how you'll actually use your new backyard centerpiece for years to come.
It really comes down to what kind of experience you're after. Are you drawn to the classic, smoky aroma and crackling sounds of a real wood fire? Or does the idea of instant flames at the flip of a switch sound more like your speed? There's no right or wrong answer, but you need to understand the trade-offs.
This isn't just about personal taste; it's part of a huge trend in outdoor living. The global fire pits market, which was valued at USD 7.7 billion, is expected to hit USD 14.9 billion by 2034. This boom is all about homeowners turning their patios into full-blown entertainment zones. And guess what? Classic wood-burning models still hold the top spot with a 42.7% market share because nothing beats that authentic campfire vibe. You can discover more insights into outdoor living market trends on market.us.
Fuel Source Comparison: Wood vs. Gas vs. Propane
Deciding on your fuel is the single biggest choice you'll make. It directly impacts your budget, how much work is involved, and the overall feel of your fire pit. Let's lay out the three main options.
This table breaks down the key differences between the three main fire pit fuel sources to help you decide which is best for your lifestyle.
| Feature | Wood-Burning | Natural Gas | Propane |
|---|---|---|---|
| Ambiance | Authentic crackle, smoke, and aroma | Consistent, clean flame | Clean, controlled flame |
| Heat Output | High, but fluctuates with the fire | Moderate to high, consistent | Moderate, consistent |
| Convenience | Requires manual effort to start and maintain | Instant on/off with a switch or valve | Instant on/off, portable tank |
| Installation | Simple masonry construction | Requires a professionally installed gas line | Self-contained, no lines needed |
| Maintenance | Regular ash cleanout and wood storage | Minimal; check burner ports annually | Refill or swap propane tanks |
| Cost | Lowest initial setup cost | Highest initial cost due to plumbing | Moderate initial cost |
Honestly, nothing beats the rustic charm of a real wood fire pit. It's perfect for roasting marshmallows and creating that classic campfire atmosphere. But it's also a commitment—you'll be sourcing and storing dry firewood, tending the flames, and scooping out ash.
Gas and propane, on the other hand, are all about convenience. A natural gas line gives you an endless fuel supply with zero mess. It’s the ultimate set-it-and-forget-it option for people who want a fire without the fuss. Propane offers the same ease of use, but with a portable tank. The only downside is you have to figure out how to hide the tank so it doesn't become an eyesore.
Selecting Materials That Define Your Style
Once you've locked in a fuel source, it’s time to pick the materials that will bring your fire pit to life. This is what sets the whole aesthetic for your patio.
- Concrete Paver Blocks: This is the go-to for most DIYers, and for good reason. The blocks are affordable, uniform in size, and incredibly easy to work with. They come in tons of colors and textures, making it easy to create a clean, modern look.
- Natural Stone: If you want a more organic, high-end feel, look at materials like flagstone or fieldstone. It's definitely more expensive and takes more skill to stack because of the irregular shapes, but the payoff is a one-of-a-kind feature that looks like it's always been part of the landscape.
- Brick: Classic fire brick gives you that timeless, traditional look. It's also incredibly durable and heat-resistant, making it a top choice for the inner wall of any wood-burning pit.
Speaking of the inside, if you're building a wood-burner, using fire-rated bricks and refractory mortar isn't optional—it's essential. Standard concrete blocks can trap moisture, and under intense heat, they can crack or even explode. Don't take that risk.
Pro Tip: Don't just think of the inside of your fire pit as a functional space. It's a design opportunity. A base layer of sand or gravel helps with drainage, while the top layer of media really finishes the look.
For a gas pit, you can go with reflective fire glass for a contemporary, glittering effect or some handsome tumbled lava rock for a more natural, earthy vibe. These materials are specifically designed to handle the heat and help spread the gas for a fuller, more impressive flame.
At the end of the day, your fuel and material choices need to work together, creating a cohesive design that fits your home and elevates how you enjoy your time outside.
What You'll Need: Your Fire Pit Tool and Material Checklist
Any seasoned builder will tell you that a successful project starts long before you lay the first block. It begins with a well-organized workspace and having every single tool and material on hand. Trust me, nothing grinds a project to a halt faster than an emergency run to the hardware store for a tube of adhesive you forgot.
Think of this list as your blueprint for a smooth, frustration-free build. We’ll break it down by each stage of the project, so you can gather everything you need with confidence.
For the Foundation and Site Prep
The strength and longevity of your fire pit hinge on a perfectly prepared base. Don't cut corners here. These are the absolute essentials for getting the ground ready.
- Shovel and Spade: You'll want a pointed shovel for digging and breaking ground, and a flat spade for shaping clean edges and leveling out the base.
- Tape Measure & Marking Paint: Precision matters. Use these to spray a clear outline of your fire pit's footprint right on the grass before you dig.
- Wheelbarrow: You’ll be moving a lot more dirt, gravel, and blocks than you think. A good wheelbarrow is a real back-saver.
- Level and a Straight 2x4: A long level is non-negotiable. You’ll use it constantly to ensure your foundation is perfectly flat and each row of blocks is plumb.
- Hand Tamper: This is a must-have for compacting your gravel base. A firm, compacted foundation prevents settling and shifting down the road.
- Paver Base or Crushed Gravel: This is the critical drainage and support layer for your entire structure.
- Landscape Fabric: Lay this down before the gravel to stop weeds from making a home in your new fire pit.
For the Fire Pit Structure
Once your foundation is solid, it's time to start building up. The materials you choose here dictate not just the look of your fire pit, but how well it holds up over time.
Here’s a pro tip I see people miss all the time: never use standard concrete landscaping blocks for the inner wall of a wood-burning pit. They look fine, but they can't handle the heat. The inside ring must be built from fire-rated bricks to prevent them from cracking or exploding.
For the walls themselves, grab these items:
- Retaining Wall Blocks or Pavers: These create the exterior look. Do the math beforehand to figure out exactly how many you’ll need for your chosen diameter and height.
- Fire Bricks: For wood-burning pits, these special refractory bricks line the inside, taking the brunt of the heat and protecting your decorative outer blocks.
- Steel Fire Pit Ring/Insert: I strongly recommend using a metal insert. It gives you a perfect circle to build around and acts as a barrier, protecting the masonry from direct flame contact and making it last much longer.
- Landscape Block Adhesive: A few beads of construction-grade adhesive between each layer, applied with a standard caulk gun, will lock everything together into one solid unit.
For a Gas-Powered Fire Pit
Going with gas? It's a fantastic choice for convenience, but it requires a specific set of components to work safely and correctly. These parts are designed to deliver and ignite the fuel for that perfect, clean flame. You'll also need to plan for proper ventilation. You can learn more about the specific vents required for block fire pit bases to ensure you're meeting safety codes.
- Burner Pan and Ring: The pan is the "floor" that holds your lava rock or fire glass, while the burner ring sits inside and distributes the gas to create a full, even flame.
- Ignition System: Your choice here ranges from a simple match-lit kit with a key valve to a more convenient push-button or electronic ignition system.
- Gas Valve and Key: This is your manual control. It lets you turn the gas on and off and adjust the flame height to get the mood just right.
- Flex Lines and Fittings: You'll need properly rated flexible gas lines and the right fittings to connect the burner assembly to the gas stub-out your plumber installed.
Bringing Your Fire Pit to Life: The Build
Alright, you've got your plans, you've got your materials—now for the fun part. This is where all that prep work pays off and you get to see your fire pit take shape right before your eyes. We’re going to walk through this step-by-step, from the very first shovel of dirt to stacking that last block.
Don't rush this stage. The secret to a fire pit that looks professionally built isn't some complex technique; it's just patience. Taking the time to get each step right, especially the foundation, makes all the difference. A solid base is truly the most important factor for a fire pit that will last for years without shifting or cracking.
A well-built fire pit is a fantastic investment. The market for them is growing at a 5.2% CAGR and is expected to continue through 2033, according to Grandview Research, because people are serious about upgrading their backyards. For a classic build, you’ll typically mark out a 4-foot circle, dig down about 8 inches, and fill half of that with a sand-gravel mix. In areas with freeze-thaw cycles, this simple step can improve stability by up to 50%. You'll then stack 12-16 courses of fire-rated blocks (usually around 16x8 inches) and lock them in with refractory mortar rated to 3,000°F. This creates a sturdy frame that can handle a good 15 pounds of oak for hours of burning.
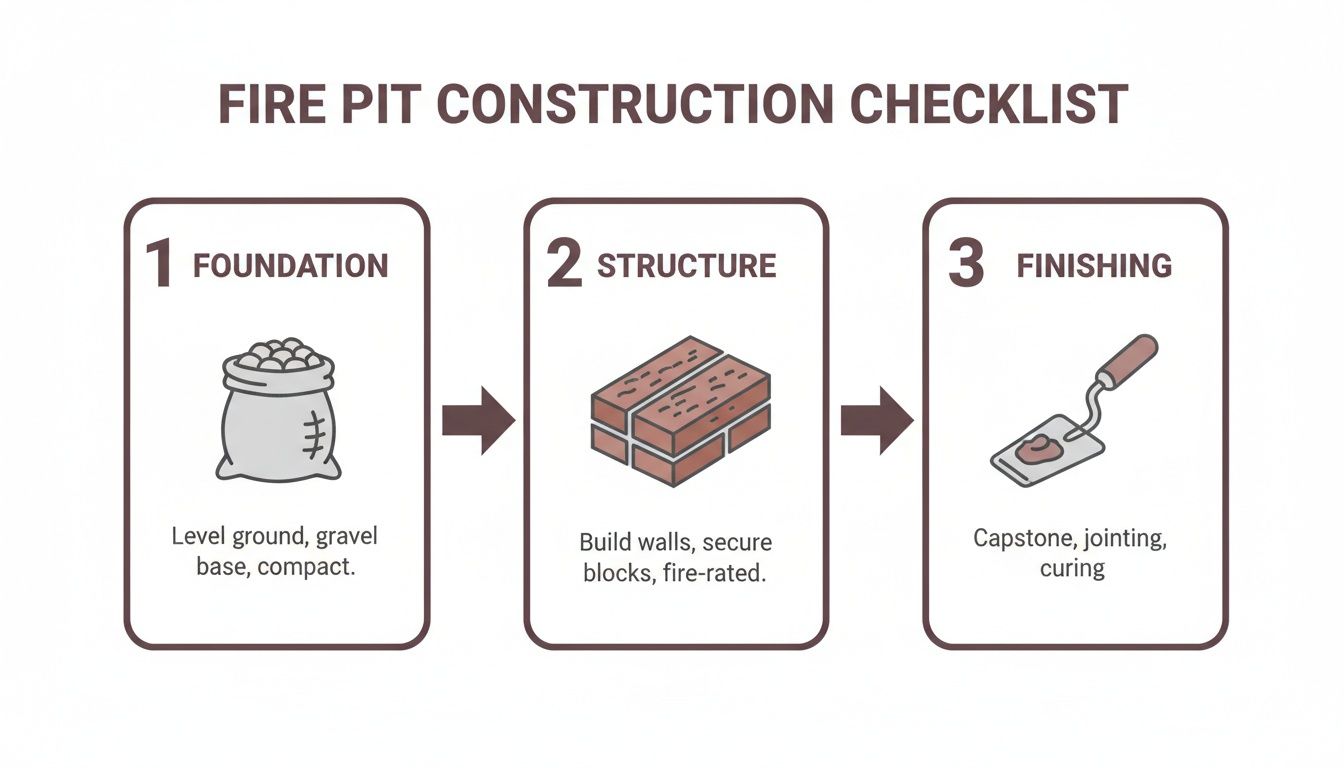
As you can see, a solid build breaks down into three core phases: getting the foundation right, building the structure, and adding the finishing touches.
Preparing the Perfect Foundation
Every solid structure starts with a good foundation, and your fire pit is no different. Getting this part right means your pit won't shift, settle, or go wonky over time—which is a big deal for both safety and aesthetics.
First things first, mark your spot. Grab a stake and hammer it into the center of where you want the pit. Tie a string to it that's half the diameter of your total gravel area (not just the pit itself), and use marking paint to trace a perfect circle. Now you have a clear guide for your dig.
Time to grab a shovel. A sharp spade works best here. You'll want to remove all the grass and topsoil inside your circle, going down about six to eight inches. The goal is a shallow, level basin. Keep a long 2x4 and a carpenter's level handy and check your work constantly. A perfectly flat base is non-negotiable for ensuring that first row of blocks sits right.
Laying the Gravel Base for Stability and Drainage
Once you’ve got your area excavated and leveled, it's time to build up the base that will support the whole thing. A compacted gravel base is key, providing both rock-solid stability and essential drainage.
Start by rolling out landscape fabric to cover the entire dug-out area. This is a must-do step to stop weeds from creeping up through the gravel and into your fire pit later on. Make sure to overlap the seams by a few inches so nothing can sneak through.
Next, pour in about three to four inches of paver base or crushed gravel. Spread it out evenly with a rake, then get to work with a hand tamper. Compacting the gravel is what will prevent your fire pit from sinking or tilting. Go over the entire area several times until it feels completely solid under your feet. If you notice any low spots, add more gravel and tamp again.
Pro Tip for a Flawless Base: Once you think you're done tamping, lay your 2x4 across the gravel and set your level on top. Sweep it in a circle across the surface. This technique, called screeding, will shave down high spots and immediately show you any low spots that need a little more gravel. It’s the easiest way to get a perfectly flat foundation.
Stacking the Walls Course by Course
This is the moment of truth—when your fire pit starts looking like a fire pit. Building the walls is a game of precision and patience, but the process itself is pretty straightforward. Your main focus? Getting that first layer absolutely perfect.
Start by placing your steel fire pit ring right in the center of your gravel base. It will serve as your guide. Carefully arrange the first course of blocks around the outside of the ring, pushing them up against each other so they fit snugly.
With the first row in place, grab your level and check it from every possible angle. Is one block too high? Give it a few taps with a rubber mallet. Is one too low? Shimmy a little extra gravel underneath it. Seriously, don't move on until this first course is perfectly level all the way around.
Now, lift the metal ring out for a moment. Using a caulk gun, apply a generous S-shaped bead of landscape block adhesive along the top of that first course. Begin setting the second course of blocks, but be sure to stagger the joints, just like you see in a brick wall. This offset pattern is what gives the wall its strength.
Just keep repeating the process: apply adhesive, stack a new course with staggered joints, and check for level after each one. Most pits end up being three to four layers high.
For those building a gas fire pit and wanting something a bit more dramatic, you might consider a custom component like a 48-inch round DIY burner kit. It can create a seriously impressive flame.
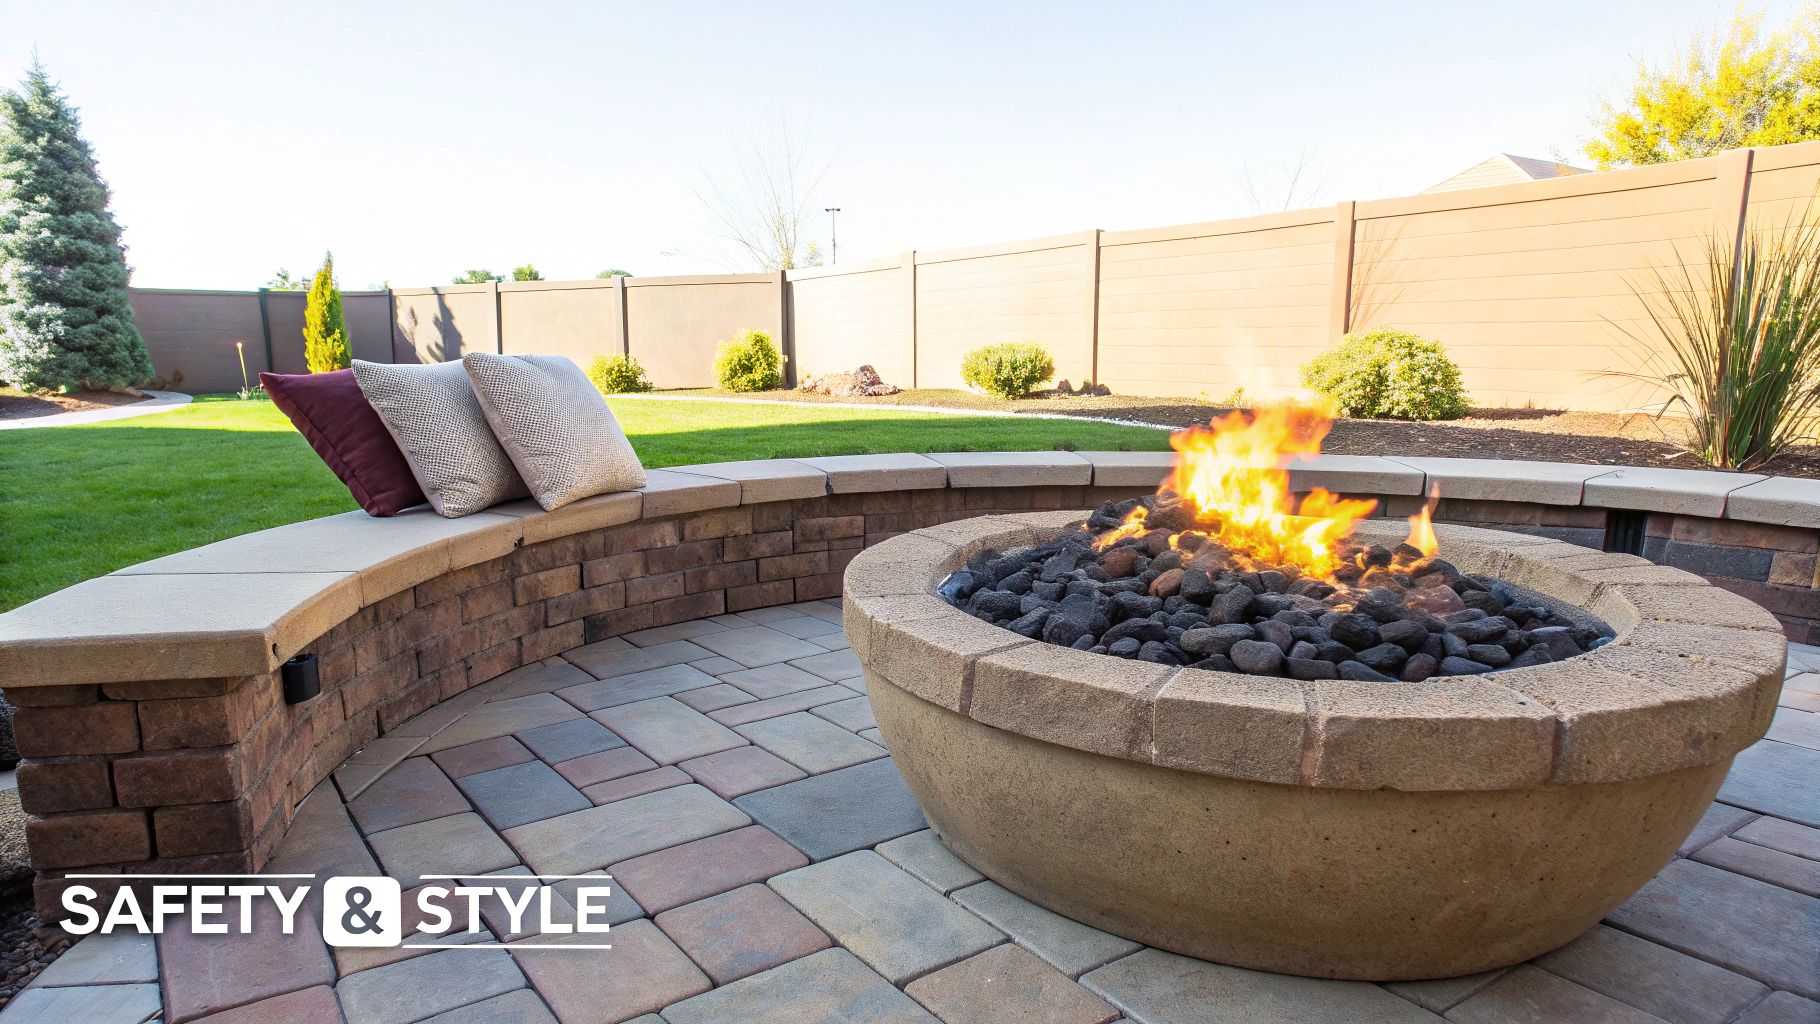
Once you’ve reached your desired height, set the steel ring back inside the walls. It should be a snug fit. This insert is crucial—it protects your blocks from the intense, direct heat of the fire and will make your fire pit last so much longer. Now, take a step back and admire what you've built.
Adding the Finishing Touches and Safety Features
With the heavy lifting done and your fire pit structure built, it's time for the details that really make it shine. These final steps are all about elevating the project from a simple ring of blocks to a custom, high-end feature. This is where we focus on both style and, more importantly, safety, turning your hard work into the stunning focal point of your backyard.
Before you even think about striking that first match, you have to get familiar with your local regulations. I can't stress this enough. Most towns have specific rules about fire pit placement, and getting this wrong can mean fines or even being forced to tear it all down. The biggest one to watch for is clearance—the minimum distance required from anything that can burn.
A common ordinance, for example, might demand your fire pit be at least 10 feet away from your house, shed, or deck, and I've seen some require as much as 25 feet. Don't forget to look up, either. Are there low-hanging tree branches or power lines overhead? A single stray spark is all it takes to start a serious fire.
Mastering Fire Pit Safety and Codes
Beyond just where you place it, a few safety features are simply non-negotiable. If you've built a wood-burning fire pit, a spark screen is an absolute must-have. This simple mesh cover sits right on top, containing embers and sparks that the wind could otherwise carry onto your lawn or, worse, your neighbor's property.
Ventilation is another critical point, especially for gas fire pits. Because propane is heavier than air, it can pool at the bottom of the enclosure if it can't escape, creating a serious explosion risk. Your fire pit structure needs vents—at least two, placed on opposite sides to allow for proper cross-ventilation.
As a rule of thumb, I always aim for at least 18 square inches of ventilation for every 100,000 BTUs your burner is rated for. But always, always double-check the manufacturer's specific requirements for your burner kit.
To help you keep everything straight, here’s a quick checklist of the essentials I run through on every project.
Essential Safety Checklist
| Safety Check | Recommended Guideline | Why It's Important |
|---|---|---|
| Clearance | 10-25 feet from any structure | Prevents accidental fires caused by radiant heat or flying sparks. |
| Overhead Space | Clear of all branches and wires | Eliminates the risk of igniting trees or damaging crucial utility lines. |
| Ventilation | Two vents on opposite sides | Allows unburned gas to safely escape and prevents dangerous buildup. |
| Spark Screen | Use with every wood fire | Contains popping embers that can easily start spot fires on dry grass. |
This table covers the big-ticket items, but remember to consult your local fire code for any additional requirements specific to your area.
Installing Capstones and Fire Media
Now for the fun part—the aesthetic upgrades. Adding capstones (or wall caps) is the single best way to give your fire pit a polished, professional look. These flat, oversized blocks are secured to the top of your wall with a good landscape adhesive, creating a clean, finished ledge that’s perfect for setting a drink on.
Next, you'll fill the inside of the fire pit with the right media. For a wood-burning pit, a few inches of sand or gravel at the bottom helps with drainage and makes cleanup easier. For a gas pit, this is where you can really add some personality.
- Lava Rock: This is the classic, rustic choice. It's fantastic at absorbing and radiating heat, which creates a wonderfully warm and even glow.
- Fire Glass: For a more modern or dramatic look, you can't beat fire glass. It comes in a huge variety of colors and reflects the flames beautifully, creating a mesmerizing, sparkling effect.
If your fire pit is in a windy spot or a high-traffic area, a quality glass wind guard is a great investment. It not only protects the flames from being snuffed out but also adds an extra layer of safety.
These are the final touches that will make your fire pit uniquely yours, tying it into the rest of your patio design and ensuring it’s a safe, inviting place for everyone to gather.
Common Questions About Building a Fire Pit
As you start planning your fire pit, you’re bound to have a few questions. I’ve been there. While the process is pretty straightforward, getting a few key details right from the start can make all the difference between a project you’re proud of and one that causes problems down the road.
We get asked these same questions all the time, so I’ve pulled together the answers that will help you move forward with confidence.
Do I Need a Permit to Build a Fire Pit?
This is the big one, and the honest answer is: it really depends on where you live.
For a simple, movable wood-burning pit made from landscaping blocks, most towns don't require a permit. But the moment you start talking about a permanent structure with a dedicated gas line, everything changes. A professionally installed natural gas or propane fire pit is almost always considered a permanent addition, and that means permits and inspections are likely part of the deal.
Your first move should always be a call to your local building department. Don't skip checking with your Homeowner's Association (HOA) either—they often have their own specific rules on size, placement, and even what materials you can use. Trust me, one phone call now can save you a world of hurt later.
What Is the Best Material for Inside a Fire Pit?
The inside of your fire pit is where the action happens, and using the right material here is non-negotiable for safety. For any wood-burning pit, the inner wall must be built with fire bricks (also called refractory bricks).
These aren't your average bricks. They're specifically designed and fired in a kiln to handle insane temperatures—often over 2,000°F—without breaking a sweat. You'll need to set them with high-heat mortar, too; regular cement just won't cut it.
A word of warning: Never, ever use standard concrete blocks or river rocks for the inner wall of a wood-burning pit. They can trap hidden moisture. When that moisture gets super-heated, it turns to steam and can cause the block or rock to crack or even explode.
For the floor of the pit, a couple of inches of sand or lava rock over your gravel base works perfectly. It’s great for drainage and helps lift the wood for better airflow.
How Much Does a DIY Fire Pit Cost?
Your total cost really comes down to three things: size, materials, and fuel type. Here’s a rough idea of what to expect:
- Basic Wood-Burning Pit: If you’re using standard retaining wall blocks from a home improvement store, you can pull off a great-looking pit for $300 to $500. That usually covers the blocks, construction adhesive, and a simple metal ring insert.
- Upgraded Stone Pit: Switching to natural stone or high-end pavers will bump up your budget. Expect to land in the $800 to $1,500 range, depending heavily on the specific stone you fall in love with.
- Gas-Fueled Fire Pit: This is where the investment gets serious. The burner kit, pan, ignition system, and gas lines are where the money goes. A DIY gas pit typically starts around $1,500 and can easily climb past $4,000, especially if you need a plumber or gas fitter to run a new line from the house.
Can I Build a Fire Pit on My Existing Patio?
You absolutely can, but you have to be smart about protecting your patio from the heat. Setting a fire pit directly on concrete or pavers is a recipe for cracked, scorched, and permanently stained surfaces.
For a permanent installation, the best approach is to cut out a section of the patio and build your fire pit on a proper gravel foundation set in the ground. If you’re looking for a less permanent option or using a portable pit, use a non-combustible barrier. A specialized fire pit mat or even a sacrificial layer of sand topped with pavers will do the trick to shield the surface underneath.
By the way, if you’re enjoying this kind of outdoor project, you might also like our guide on building an outdoor pizza oven—many of the same principles apply.
At UrbanManCaves.com, we stock the high-quality components and have the expert advice you need to build the outdoor space you've been dreaming of. Check out our collection of premium fire pit kits, burners, and all the accessories to bring your project to life. https://www.urbanmancaves.com