
Elevating your outdoor living space from a simple patio to a sophisticated entertainment hub begins with a single, transformative feature: a well-designed backyard bar. This isn't about stacking a few cinder blocks and a plank of wood. It's about creating a permanent, functional, and stylish centerpiece that reflects the quality and ambition of your home. A custom-built bar becomes the natural gathering point for every occasion, from casual family barbecues to elegant evening cocktails, seamlessly integrating leisure and luxury.
This comprehensive guide moves beyond generic suggestions to provide a detailed blueprint for ten distinct diy backyard bar ideas. Each concept is tailored for the serious DIYer and discerning homeowner who demands both high performance and aesthetic excellence. We will explore everything from a sleek, modern pergola bar with integrated climate control to a rustic stone structure complete with a roaring fireplace. Our focus is on tangible, actionable advice that you can implement directly.
For each idea, you will find:
- Detailed Concept Breakdowns: A clear vision for the build.
- Footprint and Layout Guidance: Practical spatial planning for optimal flow.
- Premium Material Recommendations: Durability meets design with materials like teak, stainless steel, and cast concrete.
- Essential Equipment Integration: Plans for incorporating professional-grade appliances like kegerators, under-counter refrigeration, and high-performance grills.
- Build Complexity & Budget Tiers: A realistic assessment of the required skill, time, and financial investment.
We will also highlight opportunities to incorporate premium components and leverage professional design support from URBANMANCAVES, ensuring your final build achieves a truly professional-grade finish. Prepare to transform your backyard into the ultimate destination for entertainment.
1. Pallet Bar Counter with Storage
The pallet bar is a classic for a reason. It's an accessible, affordable entry point into the world of diy backyard bar ideas that delivers a surprisingly versatile and stylish result. This project involves transforming readily available wooden pallets into a sturdy bar counter, ingeniously using the pallet’s natural structure to create built-in shelving for glassware, spirits, and bar tools.
By stacking and securing two or three pallets, you can quickly form the bar's base. The magic happens when you add a high-quality countertop. A polished concrete slab, a thick butcher block, or a sleek piece of slate can elevate the rustic pallet frame into a sophisticated centerpiece for your outdoor entertaining space. This approach is perfect for those seeking a modern farmhouse, coastal, or industrial aesthetic.
Project Vitals & Best Practices
- Footprint & Layout: A standard pallet is 48" x 40". A simple L-shape using three pallets creates a generous serving area and bartender space within a compact 4' x 3.3' footprint.
- Essential Equipment: This design excels at housing drop-in features. Consider a built-in ice chest or a small, self-contained beverage refrigerator that can slide into a modified pallet opening.
- Build Complexity: Low to Medium. The primary challenges are sourcing safe pallets, ensuring structural stability, and achieving a professional finish.
- Budget: $ (Entry-level). Costs are primarily driven by the countertop material and any added appliances.
Pro Tip: Not all pallets are created equal. Source pallets stamped with "HT" (heat-treated), not "MB" (methyl bromide), to ensure they are free of harmful chemicals. Always sand every surface meticulously and apply a marine-grade polyurethane sealant to protect the wood from moisture and UV damage. Reinforcing the main joints with steel L-brackets is a non-negotiable step for long-term stability and safety.
This project offers an excellent foundation. As your skills and ambitions grow, you can expand its functionality, integrating elements from more complex designs. For those planning a more extensive build, exploring comprehensive DIY outdoor kitchen plans can provide invaluable insights into layout, material selection, and appliance integration.
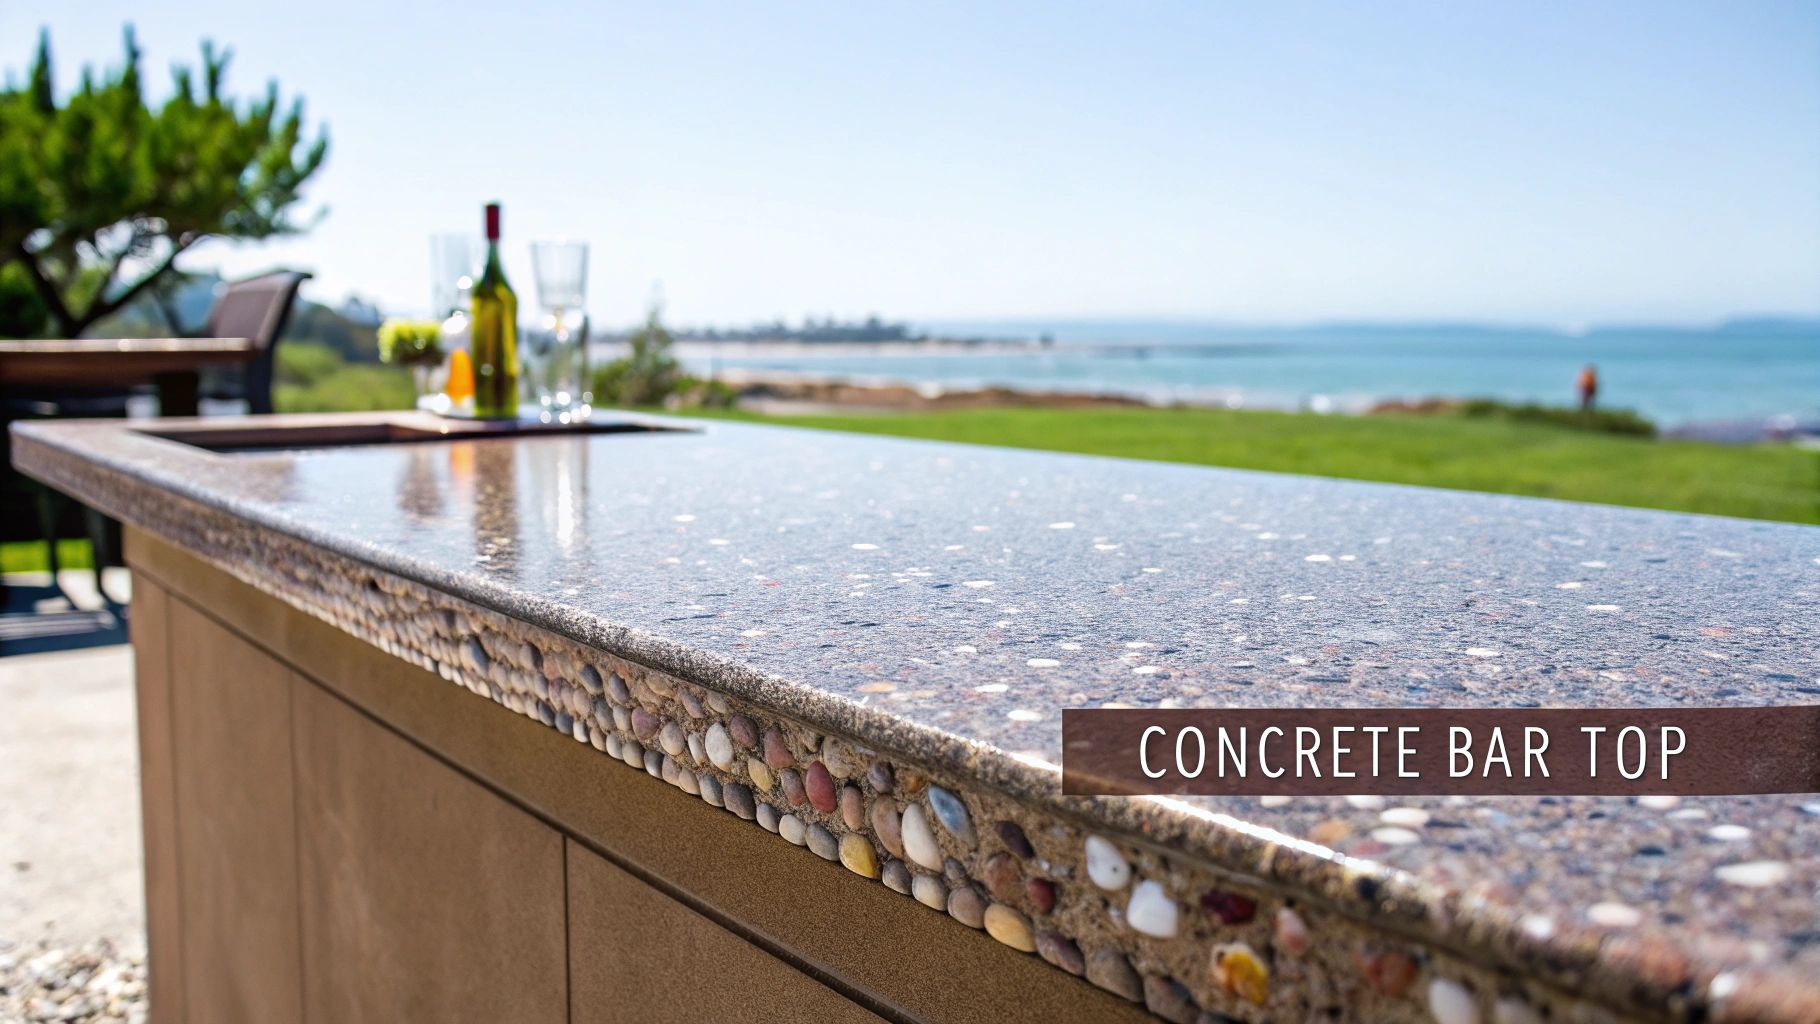
2. Concrete Pour Bar Top with Embedded Details
For those seeking a durable, high-impact centerpiece, a custom-poured concrete countertop is one of the most sophisticated diy backyard bar ideas available. This project involves creating a mold to your exact specifications, mixing and pouring concrete, and then finishing the surface to a professional-grade polish. The true beauty of this method lies in its endless customization; you can embed decorative elements like sea glass, colorful stones, metal inlays, or even fiber-optic lighting directly into the mix for a one-of-a-kind result.
This approach delivers an industrial-chic aesthetic that pairs exceptionally well with stainless steel appliances and minimalist designs. The substantial, permanent nature of a concrete bar top creates a focal point that is as functional as it is visually stunning, capable of withstanding harsh weather for years with minimal maintenance. It’s the perfect choice for a modern, high-end outdoor entertainment space designed for longevity.
Project Vitals & Best Practices
- Footprint & Layout: Completely customizable. A typical bar depth is 24-30 inches, with the length determined by your space and desired seating. A waterfall edge, where the concrete surface continues vertically down the side, adds a dramatic, contemporary flair.
- Essential Equipment: This solid surface is ideal for under-mount sinks, integrated drainboards, and drop-in beverage coolers. Pre-planning cutouts in your mold for a kegerator tap tower or an ice bin is critical before you pour.
- Build Complexity: High. Requires meticulous mold construction, precise concrete mixing, significant physical effort for pouring and moving, and patience during the lengthy curing process.
- Budget: $$$ (Mid to High-end). The primary costs are high-quality concrete mix, reinforcement materials, mold supplies, and specialized polishing tools.
Pro Tip: Your mold is your blueprint; it must be perfectly level, watertight, and reinforced to prevent bowing under the concrete’s weight. Use a quality melamine-coated particle board for a smooth finish and apply a mold release agent. Allow the concrete to cure for a minimum of 14 days before any heavy use and apply a food-safe, UV-stable sealer to protect it from stains and weather.
A concrete countertop serves as an exceptional anchor for a larger installation. For those looking to build a complete bar structure, understanding the principles of a well-designed DIY outdoor kitchen island is crucial for integrating the top into a functional and cohesive base.
3. Stainless Steel Kegerator Cabinet Build
For the serious entertainer and craft beer aficionado, integrating a draft system is the ultimate expression of hospitality. This project involves constructing a custom, weatherproof cabinet designed specifically to house a kegerator, transforming a garage appliance into a seamless, professional-grade feature of your outdoor bar. This is one of the most functional diy backyard bar ideas for those who value the quality of a perfect pour.
The core of this build is a durable frame, often made from marine-grade plywood or composite materials, which is then clad in stainless steel or powder-coated metal for a sleek, commercial look that withstands the elements. The design incorporates critical features like high-density insulation, proper ventilation for the cooling system, and a dedicated drainage pan. The result is a sophisticated, built-in beverage station that keeps beer at the perfect temperature and makes your backyard the go-to spot for game day.
Project Vitals & Best Practices
- Footprint & Layout: A standard single-tap kegerator requires a cabinet with an interior footprint of roughly 24"W x 26"D. The tap tower should be positioned at a comfortable pouring height, typically 36–42 inches from the ground, integrated into your primary bar countertop.
- Essential Equipment: The kegerator itself is the star. Complement it with a drip tray plumbed to a drain, a C02 tank storage compartment, and integrated glass storage. Consider a dual-tap tower for variety.
- Build Complexity: High. This project requires intermediate woodworking skills combined with knowledge of refrigeration, ventilation, and potentially electrical work.
- Budget: $$$ (Mid-to-high). The main costs are the kegerator unit and the stainless steel or custom powder-coated cladding.
Pro Tip: Electrical planning is paramount. A dedicated 20-amp GFCI circuit is recommended for the kegerator. Insulate the cabinet walls with closed-cell spray foam or rigid foam boards to maximize thermal efficiency and prevent condensation. Ensure all interior seams are sealed with food-grade silicone for a hygienic, easy-to-clean environment.
A built-in kegerator cabinet is a cornerstone of a high-end outdoor kitchen. To ensure it integrates perfectly with your other features, explore a comprehensive guide to high-performance outdoor kitchen appliances to coordinate finishes and functionality across your entire setup.
4. Rustic Wood and Stone Bar with Fireplace
Combining the primal allure of fire with the timeless elegance of stone and wood, this design creates a permanent, high-impact destination in your backyard. This is one of the most ambitious diy backyard bar ideas, resulting in a structure that serves as a functional bar, a cozy lounge, and a stunning architectural feature. The core concept involves building a bar using stacked stone or stone veneer, topped with a substantial wood or stone counter, and integrating an outdoor fireplace or fire table directly into the design.
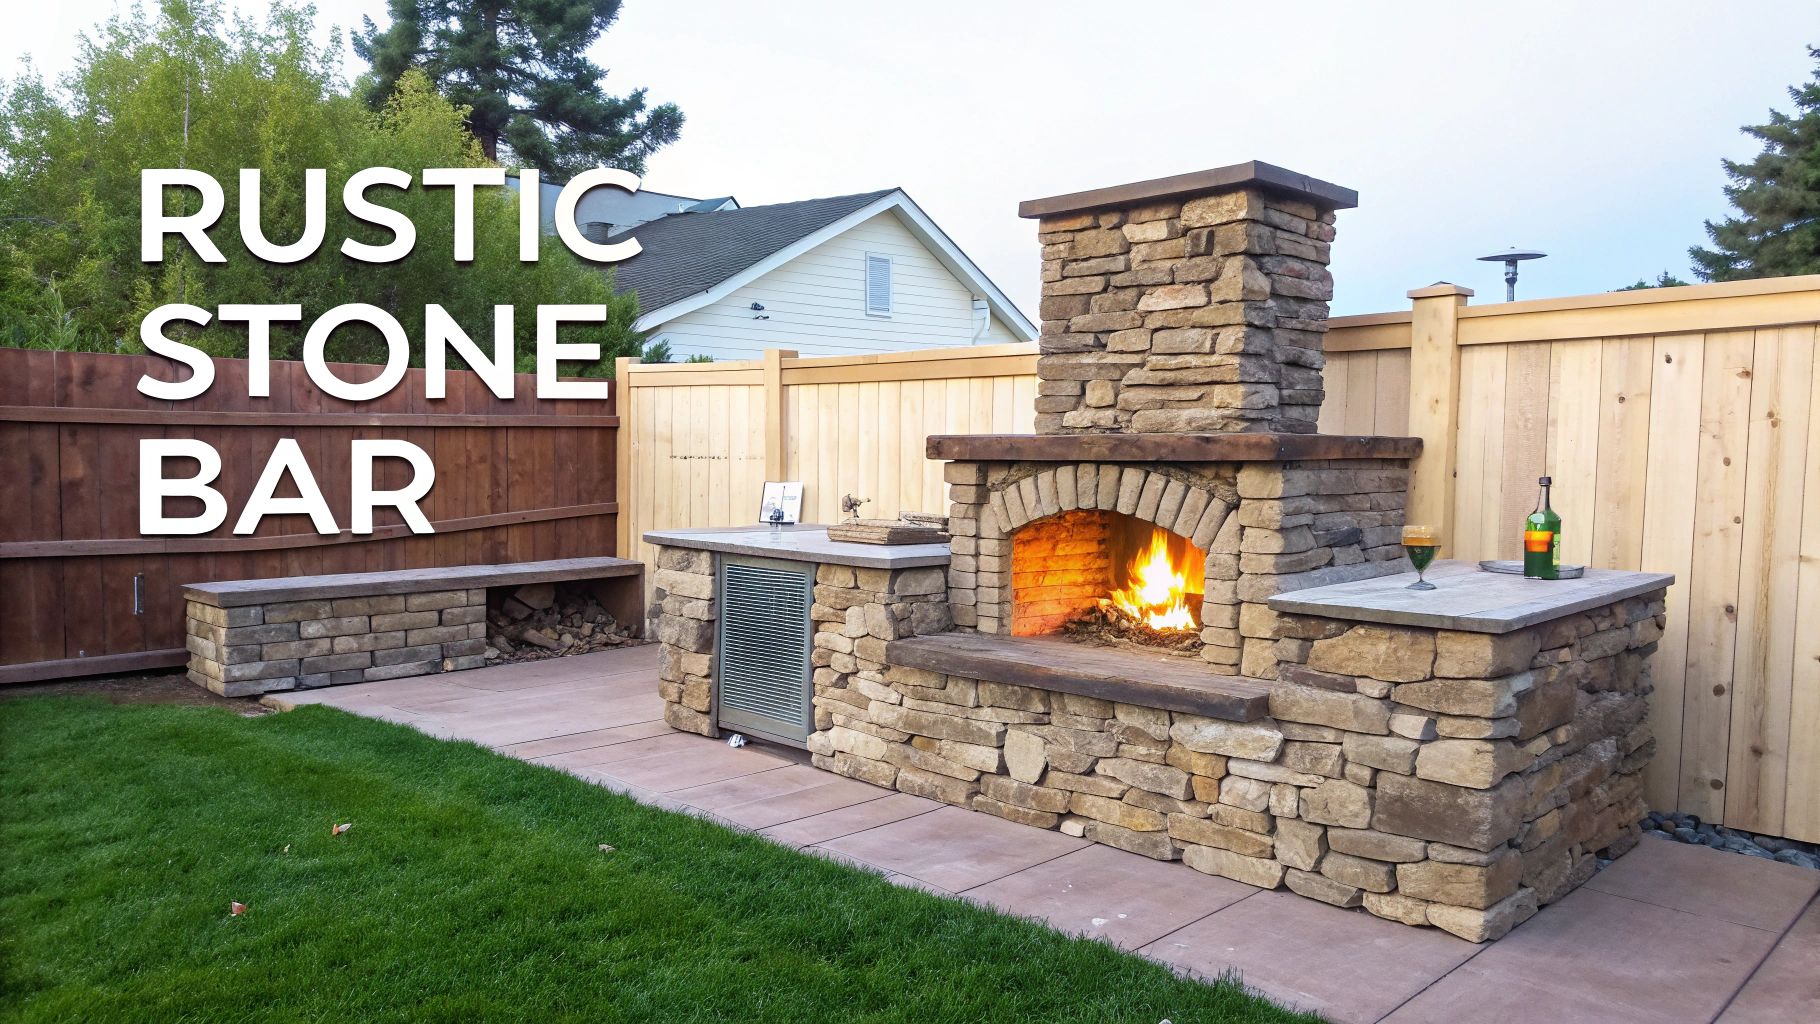
This approach is perfect for creating a luxurious, resort-like atmosphere that extends the usability of your outdoor space into cooler evenings and seasons. Whether you envision a Tuscan-inspired arch with terracotta stone or a modern farmhouse aesthetic with weathered timber and sleek, gray stone, this project establishes a true focal point for gathering and entertaining. Its substantial presence anchors your entire landscape design, offering both warmth and sophisticated ambiance.
Project Vitals & Best Practices
- Footprint & Layout: A substantial U-shape or extended galley layout works best. Plan for a minimum 12' x 10' area to comfortably accommodate the bar structure, fireplace, and safe clearance for seating. The fireplace should be the anchor point, with the bar counters extending from one or both sides.
- Essential Equipment: This build is ideal for high-end, permanent installations. Incorporate a stainless steel drop-in grill, a dedicated outdoor sink with plumbing, and under-counter refrigeration. The fireplace itself becomes the main feature, whether it's wood-burning or a gas-powered unit with a custom stone surround.
- Build Complexity: High. This project requires proficiency in masonry, framing, and potentially gas and electrical work. Permitting is almost always required due to the permanent structure and fire element.
- Budget: $$$$ (Investment-level). Costs are significant, driven by masonry materials, a proper foundation, the fireplace unit or kit, and integrated appliances.
Pro Tip: A solid foundation is non-negotiable. You must pour concrete footings that extend below your local frost line to prevent shifting and cracking. Given the complexity and safety requirements of masonry and fireplace construction, hiring a professional mason is strongly recommended. Ensure a chimney cap and spark arrestor are installed, and maintain at least 10 feet of clearance between the fireplace opening and any combustible structures. For a deeper understanding of fire feature safety and construction, review our comprehensive guide on how to build a fire pit.
5. Outdoor Kitchen Bar Integration with Grill Station
This is the apex of diy backyard bar ideas, a project that seamlessly merges a high-performance grill station with a full-service beverage bar. This ambitious build moves beyond a simple counter, creating a comprehensive entertainment hub where cooking, prep, and bartending coexist in one cohesive and highly functional unit. It’s a permanent installation designed to rival the functionality of an indoor kitchen, built to withstand the elements while providing a luxurious experience.
The core concept involves building a permanent structure, often from stone, brick, or marine-grade stainless steel, that houses a built-in grill, a dedicated sink, refrigeration, and ample counter space for both food preparation and guest seating. This creates a powerful focal point for your backyard, ideal for the serious host who wants to grill premium cuts while simultaneously mixing cocktails for guests seated at the bar. It embodies the ultimate in outdoor living, perfect for Mediterranean-style patios or sleek, contemporary poolside spaces.
Project Vitals & Best Practices
- Footprint & Layout: A linear 12' to 15' run is a common starting point. An L-shape or U-shape layout provides superior workflow, creating distinct zones for hot (grill), cold (refrigeration), and wet (sink) tasks while maximizing bar seating.
- Essential Equipment: A professional-grade built-in grill is the centerpiece. Plan for an under-counter beverage refrigerator, an outdoor-rated sink, a dedicated ice bin, and potentially a side burner or pizza oven.
- Build Complexity: High. This project requires proficiency in framing, masonry, electrical wiring, and plumbing. Professional consultation is often necessary, especially for gas line installation.
- Budget: $$$ (Premium). Costs are driven by high-end appliances, durable countertop materials like granite or concrete, and the need for professional utility installation.
Pro Tip: Design the entire layout around your primary grill. Ensure counter heights are ergonomic for both cooking and serving. All metal components, from screws to cabinet hardware, must be 316 marine-grade stainless steel to prevent rust. Install a dedicated 240-volt circuit for powerful electric appliances and run all gas lines through a protective conduit for safety and future accessibility.
This integrated approach offers unparalleled convenience and style. For those ready to undertake such a significant project, gathering diverse inspiration is key. Exploring a range of high-end outdoor kitchen ideas can help you refine your vision and ensure every detail is thoughtfully planned.
6. Upcycled Wine Barrel Bar Cart
For those who appreciate a rustic, vineyard-inspired aesthetic, the upcycled wine barrel bar cart is an unmatched choice. This project transforms a reclaimed oak barrel, rich with character and history, into a fully functional and mobile serving station. It's one of the most unique diy backyard bar ideas because it marries authentic charm with practical mobility, allowing you to reposition your bar for different events or store it easily during the off-season.
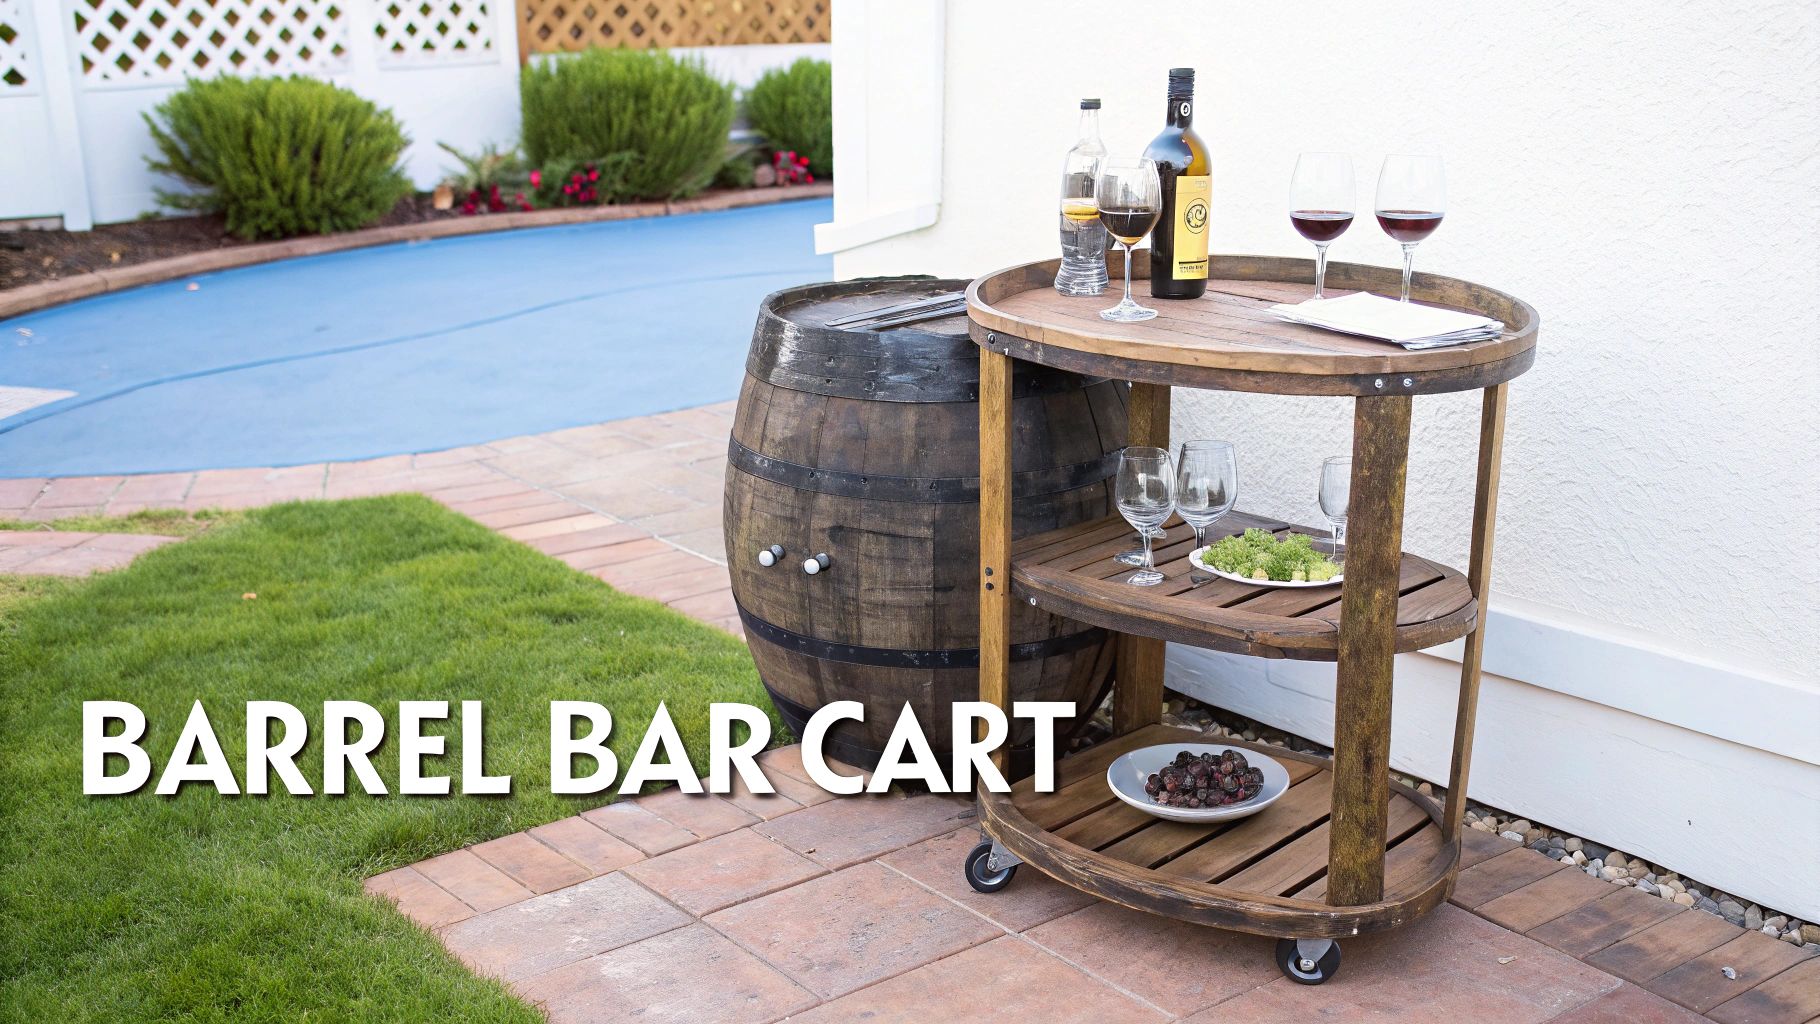
The core of the project involves cutting a door into the barrel's side to access internal storage, adding custom-fit shelving for bottles and glassware, and mounting the entire structure on heavy-duty casters. A flat, polished wood or stone top can be added for a stable serving surface. This mobile bar becomes an instant conversation piece, perfect for cottage entertaining spaces, craft brewery-themed man caves, or as a sophisticated drink station for outdoor gatherings.
Project Vitals & Best Practices
- Footprint & Layout: A standard wine barrel is approximately 22" in diameter and 35" tall. The mobile nature means its footprint is flexible, but it serves best as a standalone station rather than an integrated counter.
- Essential Equipment: This design is ideal for self-contained service. Consider adding a small tap system for a craft beer or wine keg, with the hardware discreetly housed inside the barrel. Weatherproof handles are essential for easy maneuvering.
- Build Complexity: Medium. The main challenges are precisely cutting the oak staves without compromising structural integrity and fitting custom shelving inside the curved interior.
- Budget: $$ (Mid-range). The primary cost is the barrel itself, which can vary widely in price, along with high-quality locking casters and any custom tap hardware.
Pro Tip: Source barrels from local wineries or cooperages for the most authentic look and feel. Install heavy-duty, locking casters with a diameter of at least four inches to ensure stability on uneven patio surfaces. To preserve the wood's integrity and protect against spills, thoroughly sand the interior and exterior and apply multiple coats of a food-grade, marine-spar varnish.
7. Industrial Metal and Reclaimed Wood Bar Shelving
Merging raw, functional materials with organic textures creates a visually compelling focal point. This industrial-style shelving project uses exposed metal piping and reclaimed wood planks to craft a stunning backdrop for your bottle and glassware collection. More than just storage, this is a statement piece, perfect for a dedicated wall-mounted bar area or as a feature within a larger outdoor structure.
This approach offers a high-end, custom look reminiscent of a trendy craft brewery or an urban whiskey bar. The combination of dark, rugged metal and the unique character of weathered wood brings an edgy yet warm aesthetic to any outdoor space. It's a fantastic solution among diy backyard bar ideas for those who want to maximize vertical space and display their collection with artistic flair, turning simple storage into a central design element.
Project Vitals & Best Practices
- Footprint & Layout: This is a vertical-focused design. A common layout is a 4-foot to 6-foot wide unit with three to four shelves, taking up minimal floor space while offering significant storage. Plan for 12 to 15 inches of vertical space between shelves to accommodate standard liquor bottles and taller glassware.
- Essential Equipment: This design’s primary function is display and storage. Enhance its utility with integrated features like under-shelf LED strip lighting for dramatic effect and specialized racks for hanging stemware. A complementary backsplash, like subway tile or a sheet of weathered steel, protects the wall and completes the look.
- Build Complexity: Medium. The project requires precise measurements, secure wall mounting, and the assembly of pipe fittings. Cutting and finishing the reclaimed wood also demands attention to detail.
- Budget: $$ (Mid-range). The cost is driven by the quality of the reclaimed wood and the amount of metal piping and fittings required.
Pro Tip: Use Schedule 40 black iron pipe and fittings for an authentic industrial feel and straightforward, threaded assembly. Pre-finish all metal components with a clear matte polyurethane to prevent rust before you build. When mounting, locate wall studs for maximum support; if studs are not available, use heavy-duty toggle bolt anchors rated well beyond your anticipated load. Thoroughly sand and seal reclaimed wood to prevent splinters and protect it from the elements.
8. Tiki Bar Cabana with Thatch Roof
The tiki bar cabana is a timeless and immersive choice among diy backyard bar ideas, creating a true tropical escape right in your own yard. This project focuses on building a dedicated structure, often with a bamboo or pressure-treated timber frame, crowned with a classic thatch or palm-leaf roof. It’s more than just a bar; it’s an atmospheric destination that transports guests to an island paradise, perfect for themed parties and relaxed entertaining.
The charm of a tiki bar lies in its authentic details. Bamboo cladding, a polished tropical hardwood countertop, and decorative carvings all contribute to the escapist vibe. This design doesn't just serve drinks; it creates an experience. It’s ideal for homeowners looking to dedicate a corner of their backyard to a specific theme, transforming an underutilized space into a nostalgic, mid-century-inspired retreat.
Project Vitals & Best Practices
- Footprint & Layout: A cozy cabana can be built within an 8' x 6' footprint, allowing for a 2-foot deep bar counter and a 4-foot deep space for the bartender. Larger, more elaborate designs can easily expand to 12' x 10' or more to include guest seating under the roof.
- Essential Equipment: This setup is perfect for blenders and cocktail stations. A drop-in sink is highly practical for rinsing barware and preparing fruit garnishes, while a dedicated under-counter beverage refrigerator keeps mixers and craft beers perfectly chilled without breaking the aesthetic.
- Build Complexity: Medium to High. Framing the structure is straightforward, but the real challenge lies in properly installing the thatch roof to ensure it's watertight and durable. Sourcing authentic materials also requires extra planning.
- Budget: $$ (Mid-range). Costs are influenced by the choice of framing materials (bamboo vs. treated pine), the type of thatching (natural vs. synthetic), and the countertop selection.
Pro Tip: Use pressure-treated lumber for the main structural frame for longevity and cover it with bamboo facade for the authentic look. Sealing all bamboo components with a high-quality marine-grade spar varnish every 1-2 years is crucial to prevent rot and insect damage. For the roof, consider that natural thatch requires replacement every 5-10 years, making a high-quality synthetic thatch a more durable, low-maintenance investment.
9. Modern Pergola Bar with Integrated Lighting and Fans
Integrating a bar into a modern pergola transforms a simple serving station into a designated outdoor room. This architectural approach is one of the more ambitious diy backyard bar ideas, creating an immersive entertainment hub that offers protection from the elements, sophisticated ambient lighting, and enhanced comfort. The structure itself defines the space, adding significant architectural value to your property while housing your bar and seating area.
The design centers on a sleek, often minimalist, pergola frame constructed from robust materials like pressure-treated timber, cedar, or powder-coated aluminum. This structure serves as the mounting point for essential amenities like recessed LED lighting, wet-rated ceiling fans for air circulation, and even retractable shade canopies. The result is a highly functional, all-weather bar environment that feels like a natural extension of a luxury home, perfect for high-end residential projects or those inspired by modern hospitality design.
Project Vitals & Best Practices
- Footprint & Layout: Plan for a minimum 12' x 14' footprint to comfortably accommodate the bar counter, bartender workspace, and guest seating under one cohesive structure. Ensure posts are set on concrete footings for absolute stability.
- Essential Equipment: This design is ideal for a fully equipped bar. Plan for under-counter refrigeration, a dedicated ice maker, and a plumbed sink. Integrated electrical outlets within the bar island are crucial for blenders and other appliances.
- Build Complexity: High. This project requires proficiency in structural framing, electrical wiring, and potentially concrete work. Adhering to local building codes is mandatory.
- Budget: $$$ (Premium). Costs are driven by high-quality materials for the pergola, professional-grade electrical components, and the scope of integrated appliances.
Pro Tip: Plan your electrical layout meticulously before you ever break ground. Run all wiring through conduits within the pergola's posts and beams for a clean, professional finish. Always use a licensed electrician for final connections. Opt for a smart-home integrated system to control lighting, fans, and motorized shades from a single device, creating an effortless, high-tech entertainment experience.
10. Recirculating Water Feature Bar with Ice-Cold Beverage System
For those aiming to create a truly unforgettable and luxurious outdoor space, this concept merges sophisticated ambiance with ultimate functionality. It's one of the most ambitious diy backyard bar ideas, involving the construction of a bar with an integrated recirculating water feature, such as a cascading waterfall or a serene fountain wall. This design element provides a stunning visual and auditory backdrop while simultaneously housing a high-performance, ice-cold beverage system.
The core idea is to build the bar structure around a self-contained water element, often using materials like stacked stone, polished granite, or custom tile work. The sound of flowing water creates a tranquil, resort-like atmosphere. Paired with an under-counter beverage dispenser or a custom-built chilled channel, it offers guests perfectly cold drinks on demand, making it the definitive centerpiece for high-end entertaining and relaxation.
Project Vitals & Best Practices
- Footprint & Layout: This design requires a significant footprint to accommodate both the bar and the water feature's reservoir and pump system. A linear bar of at least 8-10 feet is common, with the water feature serving as a stunning back wall.
- Essential Equipment: A powerful, quiet submersible pump is critical. For the beverage system, consider a commercial-grade glycol chiller connected to custom stainless steel drink rails or a multi-tap kegerator system discreetly built into the bar's cabinetry.
- Build Complexity: High. This project demands advanced skills in construction, plumbing, and electrical work. Professional consultation or installation for the water and electrical systems is strongly recommended.
- Budget: $$$$ (Premium). Costs are driven by custom masonry, the quality of the pump and filtration system, the chilling unit, and professional labor.
Pro Tip: Safety and maintenance are paramount. Ensure all electrical components are GFI-protected and installed by a licensed electrician. Design the water feature with an accessible reservoir and an easy-to-clean filtration system to prevent algae buildup. Using non-porous, high-grade materials like quartz or sealed stone for the bar top will prevent water staining and ensure longevity. Integrating underwater LED lighting can transform the feature into a dramatic spectacle at night.
This build is the pinnacle of custom outdoor bar design, turning a simple serving station into a dynamic work of art. For a project of this scale, leveraging a design service can help unify the complex systems into a cohesive and functional masterpiece.
10 DIY Backyard Bar Ideas Comparison
| Project | Implementation Complexity 🔄 | Resource Requirements & Cost ⚡ | Expected Outcomes ⭐📊 | Ideal Use Cases 💡 | Key Advantages ⭐ |
|---|---|---|---|---|---|
| Pallet Bar Counter with Storage | Low — basic carpentry, 1–2 weekends 🔄 | Low cost, reclaimed pallets, basic tools; $150–$400 ⚡ | Affordable, customizable, moderate durability; limited weight capacity (⭐⭐) 📊 | Budget backyard entertaining, DIY beginners 💡 | Low cost, fast build, eco-friendly ⭐ |
| Concrete Pour Bar Top with Embedded Details | Medium–High — mold making, finishing skills 🔄 | Medium–high materials, heavy; possible pro help; $500–$2,000+ ⚡ | Durable, high-end custom look; long-lasting when sealed (⭐⭐⭐) 📊 | Premium outdoor bars, custom design statements 💡 | One-of-a-kind aesthetics, heat/stain resistant ⭐ |
| Stainless Steel Kegerator Cabinet Build | High — refrigeration, electrical, plumbing expertise 🔄 | High cost, refrigeration components, stainless materials; $1,500–$4,000+ ⚡ | Professional draft dispensing, temperature control, durable (⭐⭐⭐) 📊 | Craft-beer enthusiasts, serious entertainers, semi-commercial use 💡 | Pro-quality dispensing, longevity, precise temp control ⭐ |
| Rustic Wood and Stone Bar with Fireplace | Very High — structural/masonry, permits likely 🔄 | Very high materials and labor; foundation and stonework; $3,000–$10,000+ ⚡ | Strong visual impact, durable, increases property value (⭐⭐⭐) 📊 | Large yards, luxury installations, long-term outdoor living 💡 | Timeless aesthetic, ambiance (fire), high resale value ⭐ |
| Outdoor Kitchen Bar Integration with Grill Station | Very High — appliances, gas, electrical, plumbing 🔄 | Very high cost, professional appliance install; $5,000–$25,000+ ⚡ | Full cooking+entertaining hub; significant functionality and value (⭐⭐⭐) 📊 | Home chefs, frequent entertainers, luxury homes 💡 | All-in-one functionality, convenience, major value boost ⭐ |
| Upcycled Wine Barrel Bar Cart | Low — simple woodworking, weekend build 🔄 | Low cost, reclaimed barrel, casters; $150–$500 ⚡ | Portable, charming, limited capacity, moderate durability (⭐⭐) 📊 | Small patios, mobile service, events, rustic themes 💡 | Portability, character, quick sustainable build ⭐ |
| Industrial Metal & Reclaimed Wood Bar Shelving | Medium — metalwork or prefabricated fittings 🔄 | Low–medium cost, pipes and wood; possible welding; $300–$1,200 ⚡ | Trendy feature wall, flexible storage, moderate load capacity (⭐⭐) 📊 | Accent walls, small bar zones, industrial aesthetics 💡 | Stylish, customizable, expandable over time ⭐ |
| Tiki Bar Cabana with Thatch Roof | Medium–High — specialty roofing and sealing 🔄 | Medium cost, bamboo/thatch materials, periodic replacement; $1,500–$5,000 ⚡ | Strong themed ambiance, seasonal lifespan for thatch (⭐⭐) 📊 | Poolside, tropical-themed yards, resorts 💡 | Distinctive vacation vibe, compact footprint ⭐ |
| Modern Pergola Bar with Integrated Lighting & Fans | High — structural engineering and electrical 🔄 | High cost, engineered framing and electrical; $2,000–$8,000 ⚡ | Defined outdoor room, improved comfort and usability (⭐⭐⭐) 📊 | Year-round entertaining, contemporary homes, alfresco dining 💡 | Lighting, climate control, architectural appeal ⭐ |
| Recirculating Water Feature Bar with Ice-Cold Beverage System | Very High — complex plumbing, pumps, electrical 🔄 | Very high cost, chillers and filtration; $4,000–$15,000+ ⚡ | Luxury focal point, resort-like ambiance and chilled service (⭐⭐⭐) 📊 | High-end residences, resorts, premium entertainment spaces 💡 | Unique sensory appeal + chilled drinks, high wow factor ⭐ |
Final Thoughts
We've explored an extensive range of diy backyard bar ideas, from the rustic charm of a pallet bar to the sophisticated engineering of a modern pergola bar with integrated systems. Each concept serves as a blueprint, a starting point for transforming your outdoor space into a bespoke entertainment hub. The journey from initial concept to the final toast is a testament to creativity, craftsmanship, and a commitment to building something truly exceptional.
The core takeaway is that a DIY backyard bar is far more than a place to mix drinks. It is the centerpiece of your social landscape, the anchor for memorable gatherings, and a functional work of art that reflects your personal style. Whether you were drawn to the industrial edge of metal and reclaimed wood or the tropical escape of a tiki cabana, the principles of thoughtful design and quality material selection remain constant.
Key Principles for Your DIY Bar Build
As you move forward, keep these foundational pillars at the forefront of your planning:
- Functionality First: Your bar’s layout should be intuitive. Consider the "work triangle" concept, just as you would in a kitchen, ensuring your refrigeration, sink, and primary serving area are efficiently positioned. A well-designed bar minimizes steps and maximizes your ability to host effortlessly.
- Material Integrity: The choice between teak, stainless steel, and poured concrete is not just aesthetic. It's a long-term investment in durability against sun, rain, and temperature fluctuations. Opting for premium, weather-resistant materials ensures your bar remains a stunning feature for years, not just a single season.
- System Integration: The most impressive backyard bars seamlessly integrate essential systems. This includes not only plumbing for a sink and electrical for refrigeration but also sophisticated lighting, audio, and even climate control like fans or heaters. Planning this integration from the outset prevents costly retrofitting later on.
Pro Tip: Before you finalize any design, physically map out the footprint in your yard using stakes and string. Walk through the motions of hosting: Where will guests stand? Where will you store glassware? This simple exercise can reveal crucial design flaws before you ever cut a single piece of wood.
From Blueprint to Reality: Your Next Steps
Your project now transitions from inspiration to execution. The most successful DIY endeavors are born from meticulous planning. Begin by selecting the one or two diy backyard bar ideas from our list that resonate most with your vision and the architectural style of your home.
Next, conduct a thorough site assessment. Evaluate sun exposure, proximity to utilities, and the natural flow of traffic in your backyard. This analysis will dictate not just the bar's location but also material choices and the complexity of your build.
Finally, develop a detailed project plan. This should include:
- A comprehensive materials list.
- A step-by-step construction timeline.
- A realistic, line-item budget that includes a 15-20% contingency for unexpected costs.
- A clear plan for integrating high-performance appliances like a kegerator, ice maker, or grill from a trusted supplier.
Building your own backyard bar is an ambitious but immensely rewarding project. It’s an opportunity to create a space that is uniquely yours, a destination where friends and family will gather for years to come. Embrace the challenge, invest in quality, and prepare to become the ultimate host.
Ready to elevate your DIY backyard bar with professional-grade equipment and expert guidance? The concierge team at Samal Holding Company LLC dba urbanmancaves.com specializes in sourcing the premium kegerators, custom fire features, and high-performance outdoor kitchen components that turn a great idea into a luxury destination. Explore our curated collections and let us help you source the perfect finishing touches for your project at Samal Holding Company LLC dba urbanmancaves.com.